THE SOAP MAKING PROCESS
in twelve steps.
This is the page where you learn what happens in the Soap Making Process between your initial idea of making a particular soap to actually having your own bar of soap in hand. I like to call this the process flow where you’ll see what happens at each step of the way.
I have divided the Soap Making Process into 12 basic steps. As you start reading these steps you will find yourself understanding more and more of the process and you will begin to discover new ways and ideas for creating soaps.
1. Ask yourself what senses do you want to arouse? What Qualities and Attributes do you want for your soaps?
Step 1 in the Soap Making Process is to ask yourself: What is your ideal soap? Think of the 5 senses. There is “Sight”, “Smell”, “Taste”, “Touch” and “Hearing”. Out of these five senses your soap will affect (READ MORE)
just three of the five senses “Sight”, “Smell” and “Touch”.
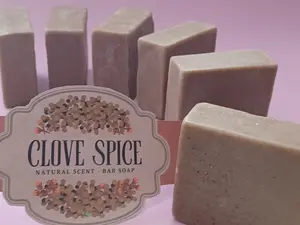
a. Lets start with sight. A visually appealing bar of soap may have bright colors in a rainbow pattern or extreme contrasts of black and white in circular swirl patterns. Maybe the soap has just one amazing color that you love. For example my favorite color is an electric blue. If you add Micas and Clays you can achieve various results. these techniques are available to learn. Either way the eyes will be satisfied looking at these soaps.
b. With smell we are thinking of arousing the olfactory sense. Smells are very powerful. They are similar to songs in the way they can send you into a different time or place. Your nose detects a fragrance you had smelled long ago and it brings you there. I remember smelling jasmine recently and I immediately was again sitting in my first grade classroom where the teacher would often times be wearing jasmine perfume!
If you want to play around with scents, it may be worthwhile to look into Essential Oils. If your not familiar with essential oils, check out the essential oil testers at your local health food store. If there are several essential oil scents that your nose loves, then you may want to incorporate them into your soaps.

c. The sense of touch is very important to your soap. How soaps feel on your skin is entirely up to you. Add exfoliating materials to your soap and you have a mild abrasive soap that will remove a layer of dead skin cells for a more healthy looking skin glow. Add a volcanic pumice material and you have a soap that will clean even the dirtiest mechanic hands you've ever seen.
Think of the qualities and attributes that you want for your soaps. A long lasting bar? Good lather? Moisturizing? The use of different oils and fats will achieve various results.
There is a tool I recommend which is a great resource to help you figure this out. Click on the link, it's called the soap-calc.
2. How many soap bars do you want to make?

Step 2 in the soap making process, decide how large of a batch you want to make. Do you want to make 4 bars of soap or do you want to make 400 pounds of soap? I will venture to say that you will probably want to make a smaller batch.
I recommend making (READ MORE) small soap batches of 8 to 12 bars. Why? One advantage of making a small batch of soap is that it forces you to be more accurate in your measurements and calculations.
Not sure what soapbox to use? We have a soapbox that works great for small batches. click on the link HERE to find out more.
If your measurements are slightly off you can “botch” the whole small batch of soap. It’s very difficult to save a “botched” batch of soap and a very messy cleanup! Second, small batches have less material costs than larger ones so if you mess it up your losses are minimal.
If you are perfecting a soap recipe, keep working with the small batch size. Once you’ve perfected your soap recipe then you can move up to making A larger batch size.
3. Calculate everything on paper first.
Step 3. Calculate your whole soap formula on paper first. It must be figured out accurately to avoid mistakes. Here are some (example) math problems common to soap making.
 |
 |
 |
(above) Here we have converted a simple fraction into a decimal number. To convert 9 5/8 into a decimal, divide the 5 by the 8 and you get .625. The answer is 9.625.
4. Choosing your Soap Making Equipment.
Step 4. Now its time to purchase your soap making equipment, supplies, tools and safety wear. Click on the link Soap Making Equipment to find what you need.
One thing to think about is where are you planning to make your soaps?
Will you be making your soaps in the kitchen? If you are working in the kitchen you may want to think about small children or pets in the house (dogs, cats, rabbits etc.) because you will be working with caustic chemicals that could spill.
If you decide to make your soaps in the garage or in a workshop you may be interested in our “Take-Apart Workbench” Compact and simple to make. LINK HERE
5. Ingredients? Its time to buy them now.
Step 5. Acquire and purchase your soap making ingredients now. Click on the link Soap Making Ingredients.
6. Measure and weigh all ingredients, materials and colorants. Then set aside.
Step 6. Now we’ve come to the measuring steps of the soap making process. STOP! PUT ON SAFETY GEAR NOW. Safety goggles, apron, blue nitrile or latex gloves. Weigh out all of your Oils and Fats on your scale. Weigh out the Lye amount you need for the batch. Weigh out the Water amount needed. Weigh out your Soap Making Materials now including Essential Oils, (Ground Materials) (Plants, Herbs, Emollients) and Colorants (Mica's Silica or Dyes) or anything else you’d like to add. Measure and weigh, then set aside for the mixing steps.
Fast Track your soap making knowledge, Download the Soap Making E-Course.
7. The critical mixing step
Step 7. We are at the critical mixing step of the Soap Making Process.
MAKE SURE YOU HAVE ALL YOUR SAFETY GEAR ON. GOGGLES, APRON, LATEX OR BLUE NITRILE GLOVES.
a. Take your tupperware container of measured lye and pour it into the 64 ounce glass measuring cup of your measured water amount. Careful now: the water temperature will rise to 190 degrees Fahrenheit or higher. Stir until the cloudiness clears.
b. Have your candy thermometers ready to measure the temperatures of each. Keep an eye on the temperature of the Lye/Water mixture. At the same time, keep track of the Oil/Fat temperature as well. You will pour the Lye/Water into the Oils/Fats when they are of equal temperatures, usually the range of equal temperature mixing is between 95 degrees and 120 degrees depending on what you want to achieve with your soap creation. Pour your Lye/Water mixture into your Oil/Fats pot. Make note of each temperature when mixed.
(Example: Lye/Water - 105 F. Oil/Fats - 103 F.)
c. Now you must stir the soapy mixture with an electric stick blender. Make sure the stick blender is completely emersed before powering up. You will want to stir the mixture until you reach "Trace".
What is trace? Trace is where the mixture begins to thicken. The mixture is slowly becoming soap. If you immerse a hand stick at trace, when you pull the hand stick out the drips will leave a trace mark on the surface of the mixture. This is "Trace".
This is your creative window to entice your 3 senses: Sight, Smell and Touch. This is where the magic happens. At "Trace" you will add all of your Colorants (Mica's, Silica and Dyes) for your visual enhancement. You will add your Essential Oils now for your olfactory scents and fragrant smells. You will add your Materials (Ground Materials) now (Plants, Herbs, Spices, Emollients, Abrasives, Grains, etc.) for the texture and feel of your soap.
8. Pouring the soap substance into your box mold and insulating.
Step 8 in the Soap Making Process is Pouring and Insulating. This step involves pouring the soap substance into your box mold and then insulating the box with a towel. This is also the gel phase. Gel phase occurs depending on what temperatures you mixed the oils and lye at.
Generally for regular soaps you will insulate the soap box with a towel for a 24 hour period of time. For Milk Soaps and oven process there is another procedure involved.
9. Cleanup now or wait 24 hours.
Step 9 in the Soap Making Process. Cleanup, There are two ways to do this. You can either cleanup right now or you can wait 24 hours. If you are like me, you'll want to clean up immediately after you have poured the soap into your mold.
1. If you cleanup right now, I recommend using many paper towels to wipe off the soap (that has not yet saponified) from your soap making utensils, pots and measuring cups. Remove as much as possible. Do this before you rinse and clean the equipment. You want to avoid pouring the unsaponified oils and fats down your drain. If you do, your drain will clog up eventually.
If your drain is clogged and backing up from soap making, I have a 25% off coupon you can redeem when you call ( ). We have a national account set up with them for this purpose. LINK
2. Wait and cleanup in 24 hours. Let the dirty equipment set somewhere out of the way. After that time all the gooey soap substance on your equipment will have saponified and turned to soap! This means that your dirty equipment will be coated with fresh soap and your cleanup will be a snap!
I have cleaned up both ways. I would recommend waiting 24 hours to cleanup. You can cut your soap bars and then cleanup your equipment. The choice is up to you.
10. Pull out your soap loaf and cut into desired bar size.

Step 10 in the soap making process. Unmolding. (left picture ) Take the lid off your soap box.

(right picture) Removing the thumb screws of the soap box door.

(Left picture) Pull the soap loaf out of the box.

(picture right) Cut your soap loaf into the desired soap bar size. Use a straight soap cutter like this one being used.
After this Step in the Soap Making Process you can clean your dirty equipment (from 24 hours ago) along with your soap cutters as well.
Don't have your soap cutter yet? Click on Soapmaking Equipment for several soap cutters available plus get a coupon for 40% off!
When you cut the bars. Weigh one of them first. Make sure they weigh 0.3 to 0.35 ounces more than your desired bar size. Check out this video for more information.
11. Let the soap cure.

Step 11 of the soap making process is to let your soaps cure. The soaps need to cure for a minimum of 4 weeks and a maximum of 6 weeks (sometimes longer).
Store your soap bars in a cool dry place (example; the upper shelf in your closet).
Check the bars occasionally to see if there is a white film coating on the surface. If there is, this is a soda ash deposit. It does not make your soaps look pretty. There is a real easy way to remove soda ash from your soaps. Click on this video link here to find out how!
12. The last step in the Soap Making Process is to check your results.
Step 12. Checking your results. First of all, congratulate yourself, you've completed all the soap making process steps and have created your soap! When the soap is ready, use it, see how you like it.
Write down your observations. Did the soap come out the way you wanted? Does it look the way you want it to look? Does it smell right? What is it lacking if anything? If the results are not to your liking, start the soap making process over again and change your formula until you come up with a soap that you love.
Recent Articles
-
Soap Bar Marketplace
Dec 29, 25 07:38 PM
 Find out what soaps are currently available! Purchases, Pre-Orders and Limited Time Offers are found here on the new Soap Bar Marketplace page. Check it out!
 -
Best Soap Calculator
Dec 29, 25 07:37 PM
 Are you designing a new soap recipe? Find out which of the many soap calculators out there is the best soap calculator to use.
 -
Lye For Soap Making
Dec 29, 25 07:35 PM
Does lye make you fearful? Well fear not! Understand that lye is a powerful friend in soap making. Without lye there is no soap. Learn to handle lye in a safe manner and you will increase your soap ma…